
PROTOTYPE ADJUSTMENT
1. INTRODUCTION
Paragliders designed by the Flight Laboratory are purely experimental. In general, paragliders built exactly according to the plans that come out of the design program, fly without problems. Sometimes with new models (not previously tested) it may be necessary to make some changes to improve the stability and flight qualities. Let's see which parameters are the most important to control.
2. CALAGE
Example BHL5 24 m2:
Risers extensions (cm)
-------------------------------------------
i alpha A B C D Calage %
1 0.00 0.00 0.00 0.00 0.00 30.00
2 0.12 0.36 0.25 0.15 0.00 30.58
3 0.24 0.72 0.50 0.29 0.00 31.16
4 0.36 1.08 0.75 0.44 0.00 31.73
5 0.48 1.44 1.00 0.59 0.00 32.31
6 0.60 1.80 1.25 0.73 0.00 32.89
7 0.72 2.16 1.50 0.88 0.00 33.47
8 0.84 2.52 1.75 1.03 0.00 34.05
9 0.96 2.88 2.00 1.17 0.00 34.63
10 1.08 3.24 2.25 1.32 0.00 35.21
11 1.20 3.60 2.50 1.46 0.00 35.79
12 1.32 3.96 2.75 1.61 0.00 36.37
13 1.44 4.32 3.00 1.76 0.00 36.95
14 1.56 4.68 3.25 1.90 0.00 37.53
15 1.68 5.04 3.50 2.05 0.00 38.11
16 1.80 5.40 3.75 2.20 0.00 38.70
17 1.92 5.76 4.00 2.34 0.00 39.28
18 2.04 6.12 4.25 2.49 0.00 39.86
19 2.16 6.49 4.50 2.63 0.00 40.44
20 2.28 6.85 4.75 2.78 0.00 41.02
21 2.40 7.21 5.00 2.93 0.00 41.60
22 2.52 7.57 5.25 3.07 0.00 42.19
23 2.64 7.93 5.50 3.22 0.00 42.77
24 2.76 8.29 5.75 3.36 0.00 43.35
25 2.88 8.65 6.00 3.51 0.00 43.93
26 3.00 9.01 6.25 3.66 0.00 44.52
For other sizes apply linear correction factors according to the value k = sqrt (S2 / S1), where S1 = initial surface, S2 = final surface.
3. BRAKE LINE LENGTH
4. GEOMETRIC TORSION (WASHIN)
Geometric torsion is the relative difference in angle of attack between profiles.
Paragliders generally have a positive geometric torsion, ie the angle of attack of the wing tip profiles is greater than the angle of attack of the central profile.
This provides a good pressure distribution over the span. If the geometric torsion is small the wing tips may have a tendency to collapse.
If the geometrical torsion is too high, the wing tips may have a tendency to stall when applying braking.
As always, we need to find an ideal middle point. In double surface paragliders, we have experimented with good results with geometric washin values between 4º and 6º.
In single-surface paragliders we have experimented with values of 6º, 10º and even more.
With single skin paragliders that incorporate rotations of the profiles around the "z" axis, the washin angle values can be significantly reduced, expecting a performance boost for this effect.

Geometric torsion, frontal view and airfoil sections.
It is not easy to progressively modify the washin angle of an already built prototype, but not impossible.
The strategy is to lengthen or shorten the main outer suspension and its upper branches.
Make gradual changes to the outside lines of the rest of the risers, except one riser, which will remain unchanged.
This can be done by adding small loops of string to the lines we want to lengthen.
Use a laminar wind inflation ground handling session, testing and changing loops. Hard work, but not impossible.
The BHL1 paraglider incorporates corrections made in this way.
Of course, the most accurate way to do this is to recalculate the new set of lines with the program, and rebuild them.
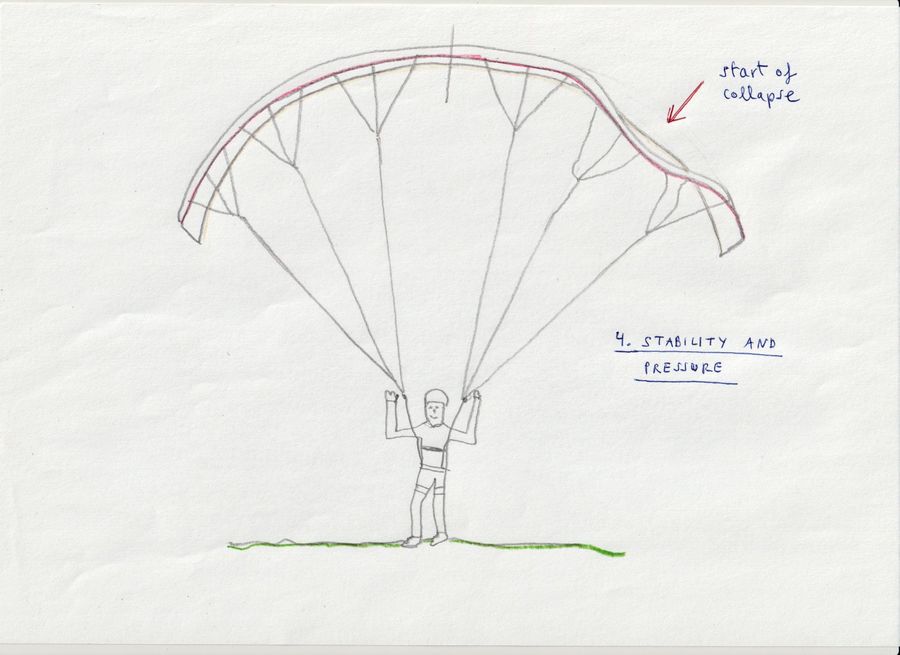
Start of collapses whe ground handling in constant and laminar wind,
may indicate some mismatch of the above parameters: calage, brake length, or geometric torsion.
Parameter mismatches can be combined, so they need to be identified individually.
1. INTRODUCTION
Paragliders designed by the Flight Laboratory are purely experimental. In general, paragliders built exactly according to the plans that come out of the design program, fly without problems. Sometimes with new models (not previously tested) it may be necessary to make some changes to improve the stability and flight qualities. Let's see which parameters are the most important to control.
2. CALAGE
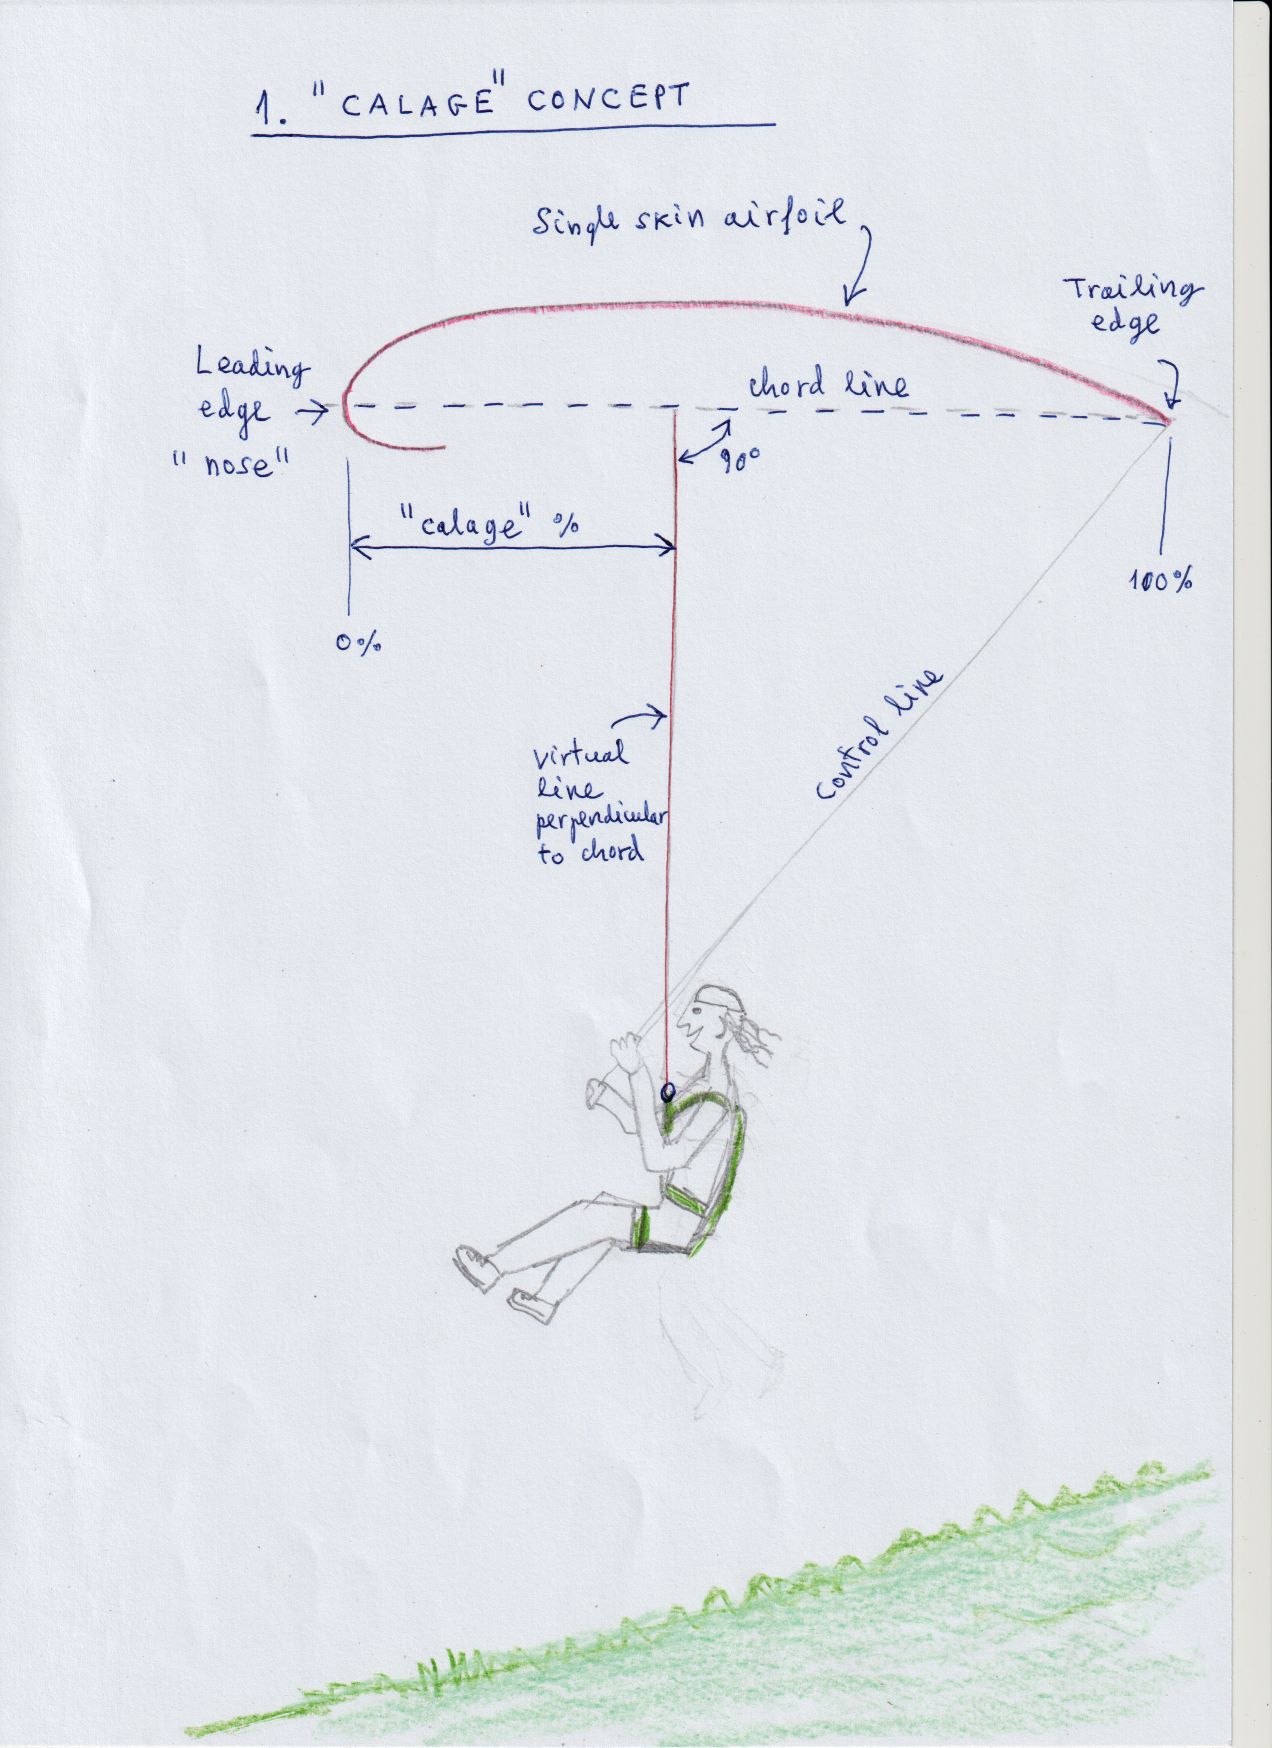 |
This is the most important parameter for the final adjustment of the paraglider. We have written about this in other articles in the Laboratori. But it is worth remembering because it is the key parameter. We define the "calage" (word of French origin), as the distance expressed in% of the central profile chord, between the nose of the wing and a point on the chord that is the intersection of a line perpendicular to the chord, and passing by the pilot's position. That is to say, the calage is the position of the pilot with respect to the central profile chordline. The ideal calage setting cannot be calculated numerically accurately because a large number of other parameters influence it. That is why in LEparagliding this value is established empirically, based on experience with previous models. A small calage value implies a position of the pilot closest to the leading edge, fastest wing, small angle of incidence and closest to collapses frontal or wingtip collapses. When we apply the speed system what we are doing is modifying the calage to make it smaller. A big calage value implies a pilot position farthest to the leading edge, slower wing, higher angle of incidence, and wing closer to the stall when we apply braking. We need to find the ideal point, which is usually the position that gives us the most glide angle hands up. This is the position with which the wing is projected. So you don't have to do anything! :) But sometimes things are not perfect. If your wing inflates with difficulty, it means that the calage point is too far back. If the leading edge collapses too easily, it means that the calage is too far forward. |
| The best
and simplest way to modify the calage is with special variable risers,
which allow you to lengthen or shorten the risers at will. A test pilot
must have risers like these to be able to test different settings. In
order to reduce the calage (angle of attack), it is necessary to
shorten the front risers or lengthen the rear risers, always
proportionally, so as not to deform the profile excessively. In order
to increase the calage (angle of attack), it is necessary to lengthen
the front risers or shorten the rear risers, always proportionally, so
as not to deform the profile excessively. But how much to lengthen or shorten the risers so as not to deform the profile excessively? Section 7 of the lep-out.txt file (from your specific model and size) contains a list that may be useful. Once the ideal setting has been determined experimentally, it is necessary to build new fixed risers (with optional accelerator or trimmer). With these risers the prototype can be flown in normal use without problems. Over time, when it is time to renew the suspension lines, it is advisable to build a new set of lines already adjusted to the ideal calage, so that standard risers of constant length can be used. It is possible to modify only the main lines, or better to recalculate a new set of lines modifying section 8 of leparagliding.txt. This last option is the most accurate. |
|
Example BHL5 24 m2:
Risers extensions (cm)
-------------------------------------------
i alpha A B C D Calage %
1 0.00 0.00 0.00 0.00 0.00 30.00
2 0.12 0.36 0.25 0.15 0.00 30.58
3 0.24 0.72 0.50 0.29 0.00 31.16
4 0.36 1.08 0.75 0.44 0.00 31.73
5 0.48 1.44 1.00 0.59 0.00 32.31
6 0.60 1.80 1.25 0.73 0.00 32.89
7 0.72 2.16 1.50 0.88 0.00 33.47
8 0.84 2.52 1.75 1.03 0.00 34.05
9 0.96 2.88 2.00 1.17 0.00 34.63
10 1.08 3.24 2.25 1.32 0.00 35.21
11 1.20 3.60 2.50 1.46 0.00 35.79
12 1.32 3.96 2.75 1.61 0.00 36.37
13 1.44 4.32 3.00 1.76 0.00 36.95
14 1.56 4.68 3.25 1.90 0.00 37.53
15 1.68 5.04 3.50 2.05 0.00 38.11
16 1.80 5.40 3.75 2.20 0.00 38.70
17 1.92 5.76 4.00 2.34 0.00 39.28
18 2.04 6.12 4.25 2.49 0.00 39.86
19 2.16 6.49 4.50 2.63 0.00 40.44
20 2.28 6.85 4.75 2.78 0.00 41.02
21 2.40 7.21 5.00 2.93 0.00 41.60
22 2.52 7.57 5.25 3.07 0.00 42.19
23 2.64 7.93 5.50 3.22 0.00 42.77
24 2.76 8.29 5.75 3.36 0.00 43.35
25 2.88 8.65 6.00 3.51 0.00 43.93
26 3.00 9.01 6.25 3.66 0.00 44.52
For other sizes apply linear correction factors according to the value k = sqrt (S2 / S1), where S1 = initial surface, S2 = final surface.
3. BRAKE LINE LENGTH
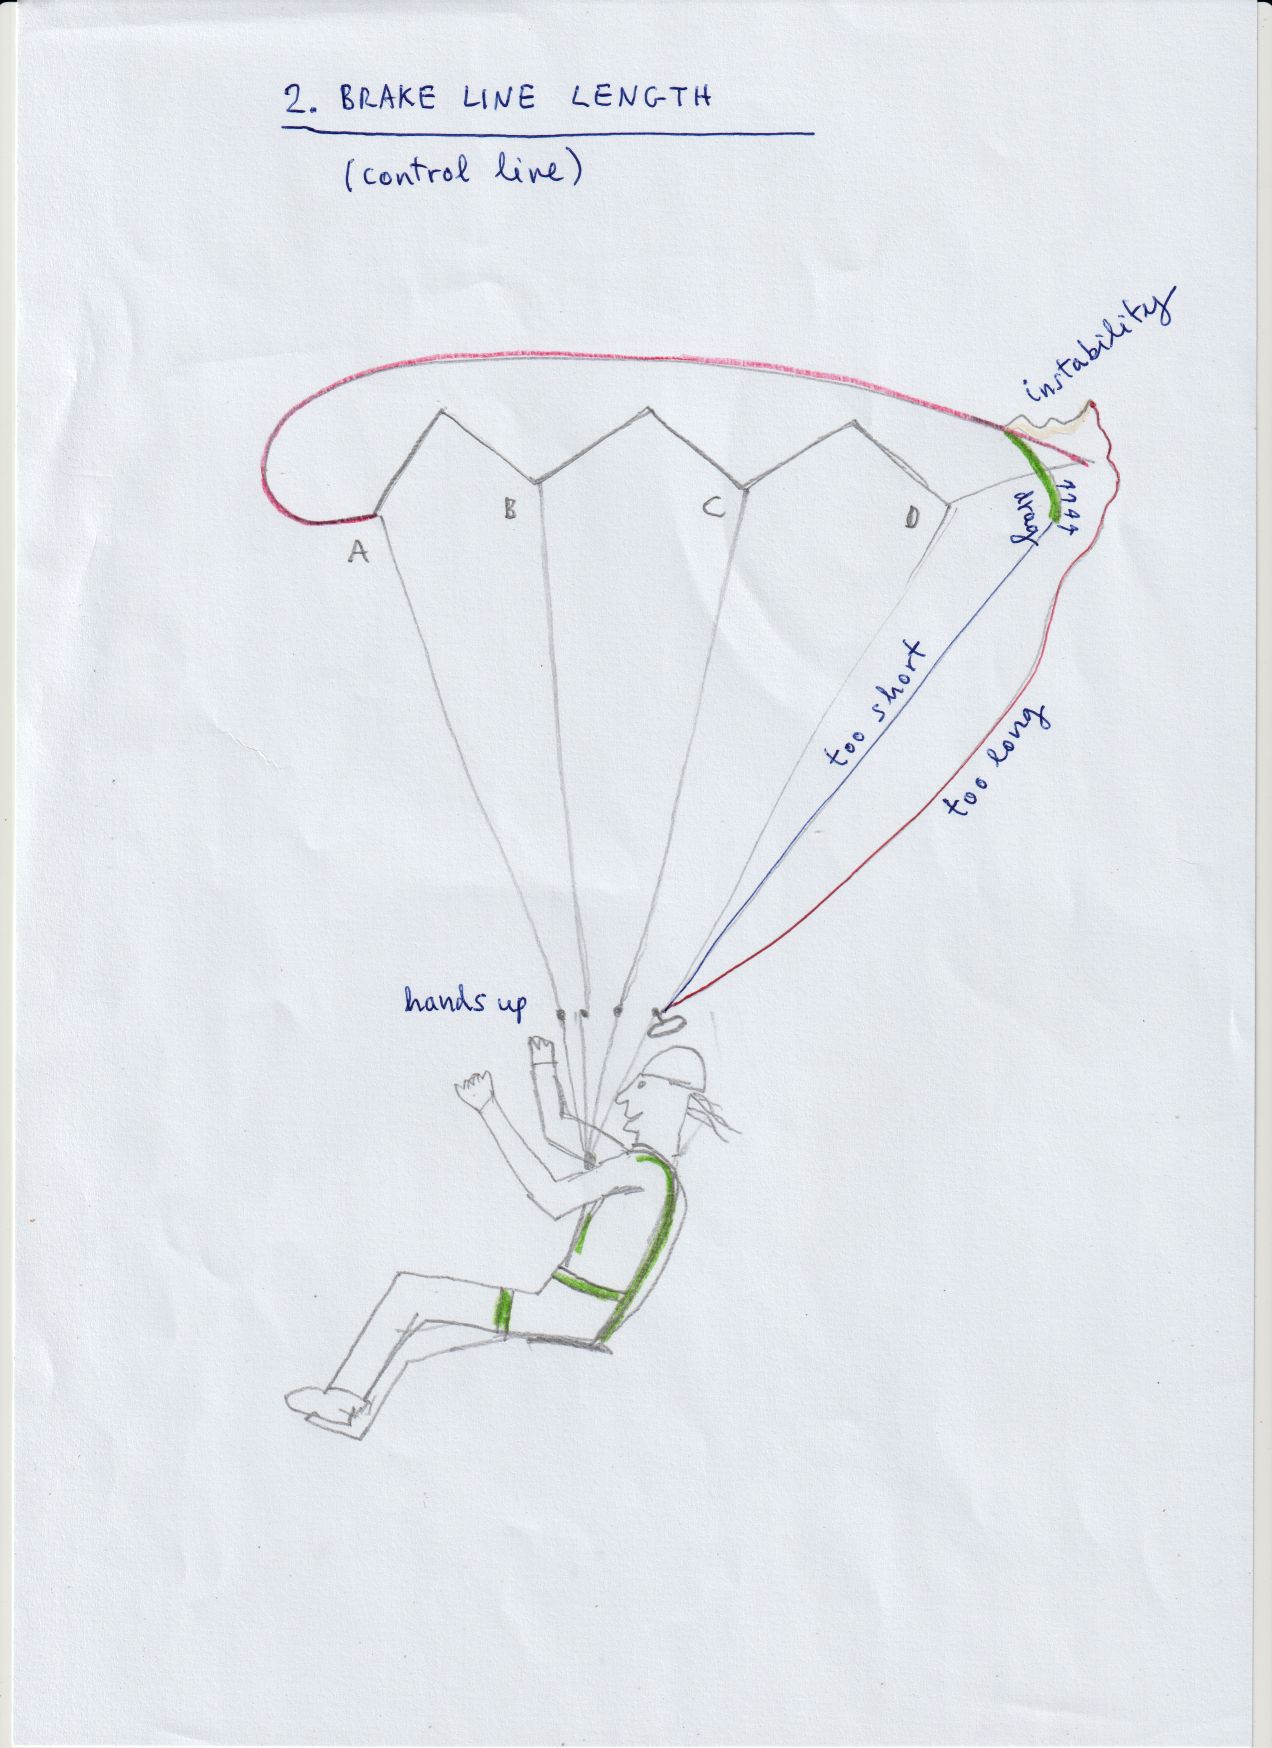 |
The ideal adjustment of the
brake length is important for all paragliders, but especially for
single skins. Improperly adjusted brake length may result in loss of
performance, inability to control (!), or in-flight instability. Therefore, before flying a new paraglider it is essential to verify that the brake length is correct. Too short a brake line (when hands up) will involve applying constant braking to the trailing edge. This implies aerodynamic drag and loss of top speed. But it also involves a little more stability and pressure on the wing. A brake line that is too long for double-surface paragliders usually only involves a loss of control (it is necessary to lower the handles a lot to turn or brake). A brake line that is too long for single surface paragliders generally involves loss of control, and possibly instability on the trailing edge, transverse wrinkles, vibrations, easy leading edge collapses, and general loss of pressure. That is why in single skin paragliders, it is necessary to make a very precise adjustment of the brake length. Generally the "ideal" fit is when hands up, an small transverse wrinkle appears around the D-E zones, and applying a little braking disappears. The fewer anchor points per profile our paraglider has, the more important the effect of the fit. In the plans of LEparagliding the length of the main line is given to the link C or D. It is necessary to add a little more to fix to the handle. |
4. GEOMETRIC TORSION (WASHIN)
Geometric torsion is the relative difference in angle of attack between profiles.
Paragliders generally have a positive geometric torsion, ie the angle of attack of the wing tip profiles is greater than the angle of attack of the central profile.
This provides a good pressure distribution over the span. If the geometric torsion is small the wing tips may have a tendency to collapse.
If the geometrical torsion is too high, the wing tips may have a tendency to stall when applying braking.
As always, we need to find an ideal middle point. In double surface paragliders, we have experimented with good results with geometric washin values between 4º and 6º.
In single-surface paragliders we have experimented with values of 6º, 10º and even more.
With single skin paragliders that incorporate rotations of the profiles around the "z" axis, the washin angle values can be significantly reduced, expecting a performance boost for this effect.
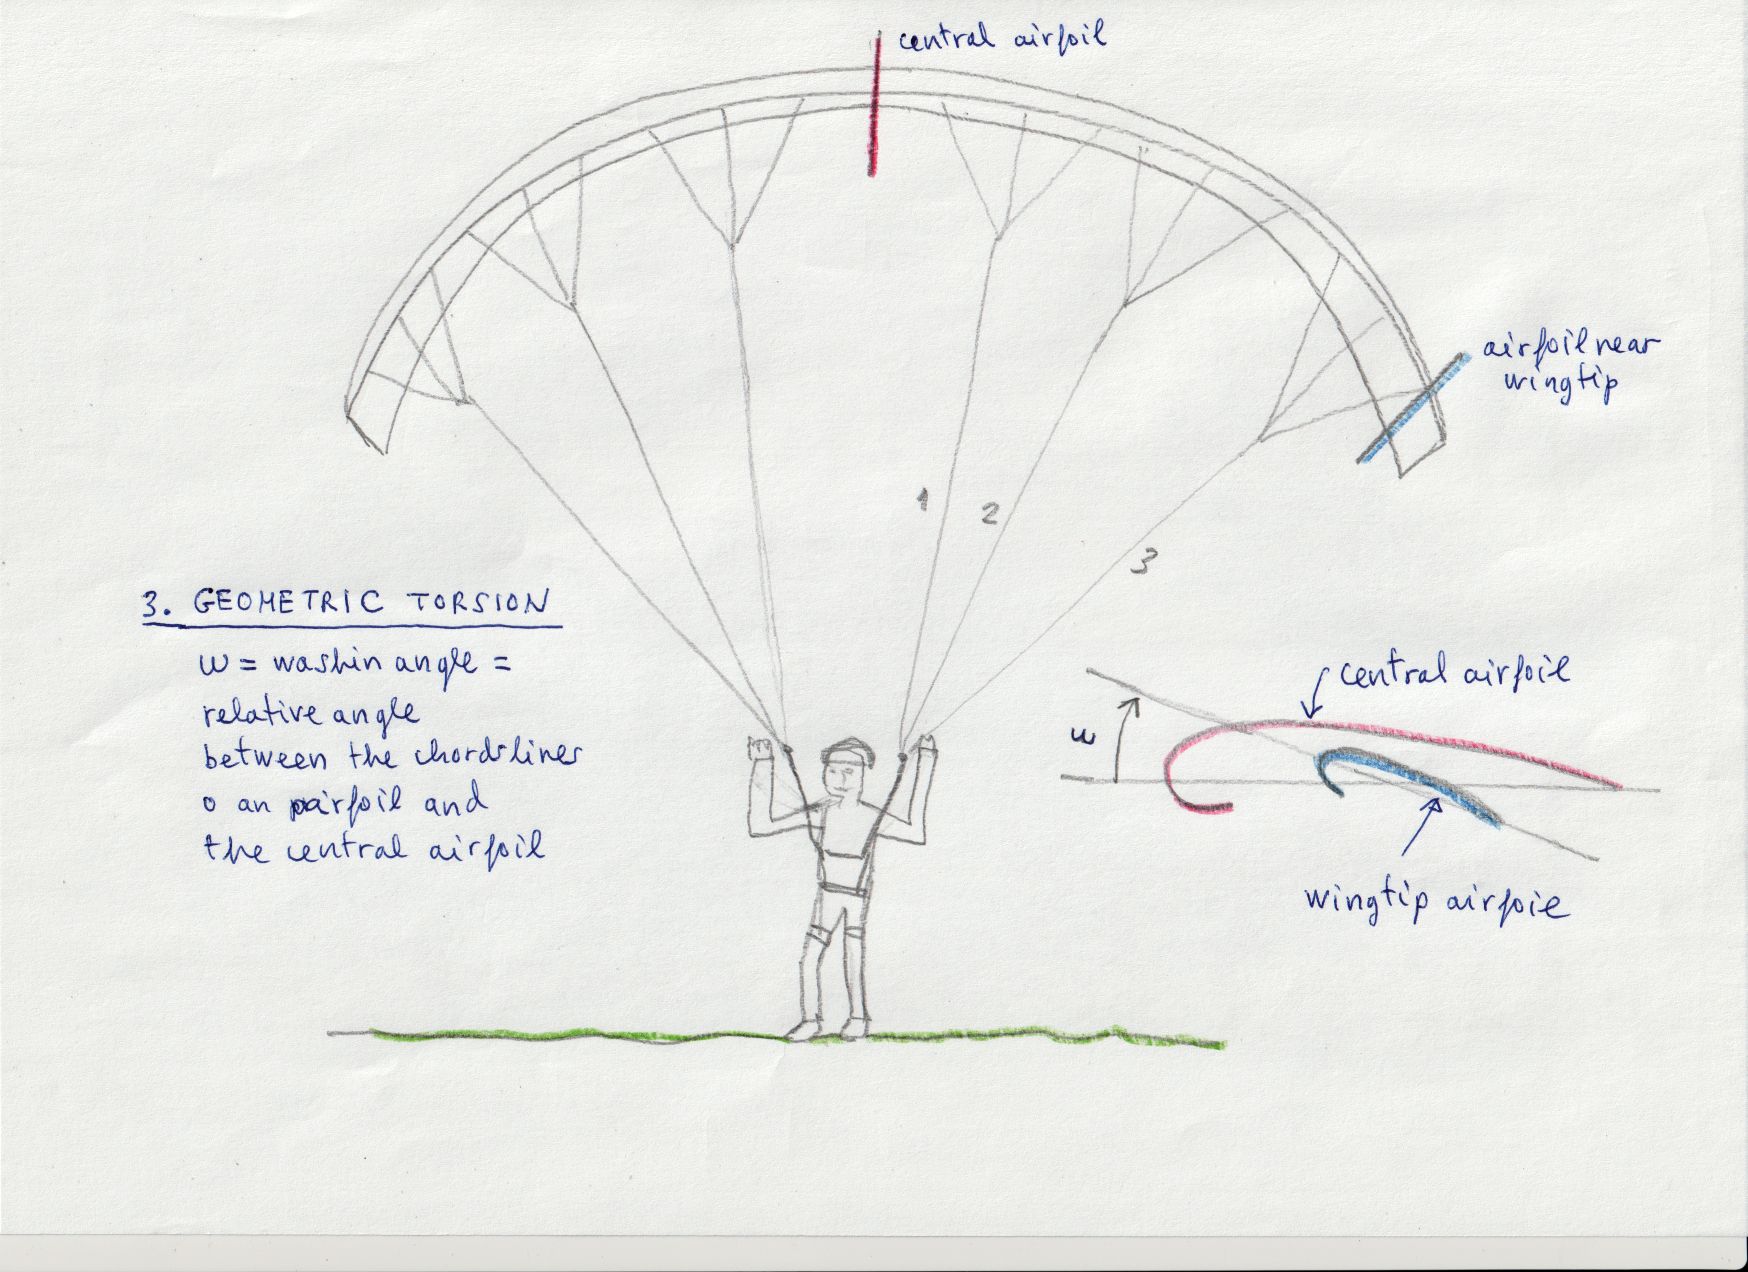
Geometric torsion, frontal view and airfoil sections.
It is not easy to progressively modify the washin angle of an already built prototype, but not impossible.
The strategy is to lengthen or shorten the main outer suspension and its upper branches.
Make gradual changes to the outside lines of the rest of the risers, except one riser, which will remain unchanged.
This can be done by adding small loops of string to the lines we want to lengthen.
Use a laminar wind inflation ground handling session, testing and changing loops. Hard work, but not impossible.
The BHL1 paraglider incorporates corrections made in this way.
Of course, the most accurate way to do this is to recalculate the new set of lines with the program, and rebuild them.
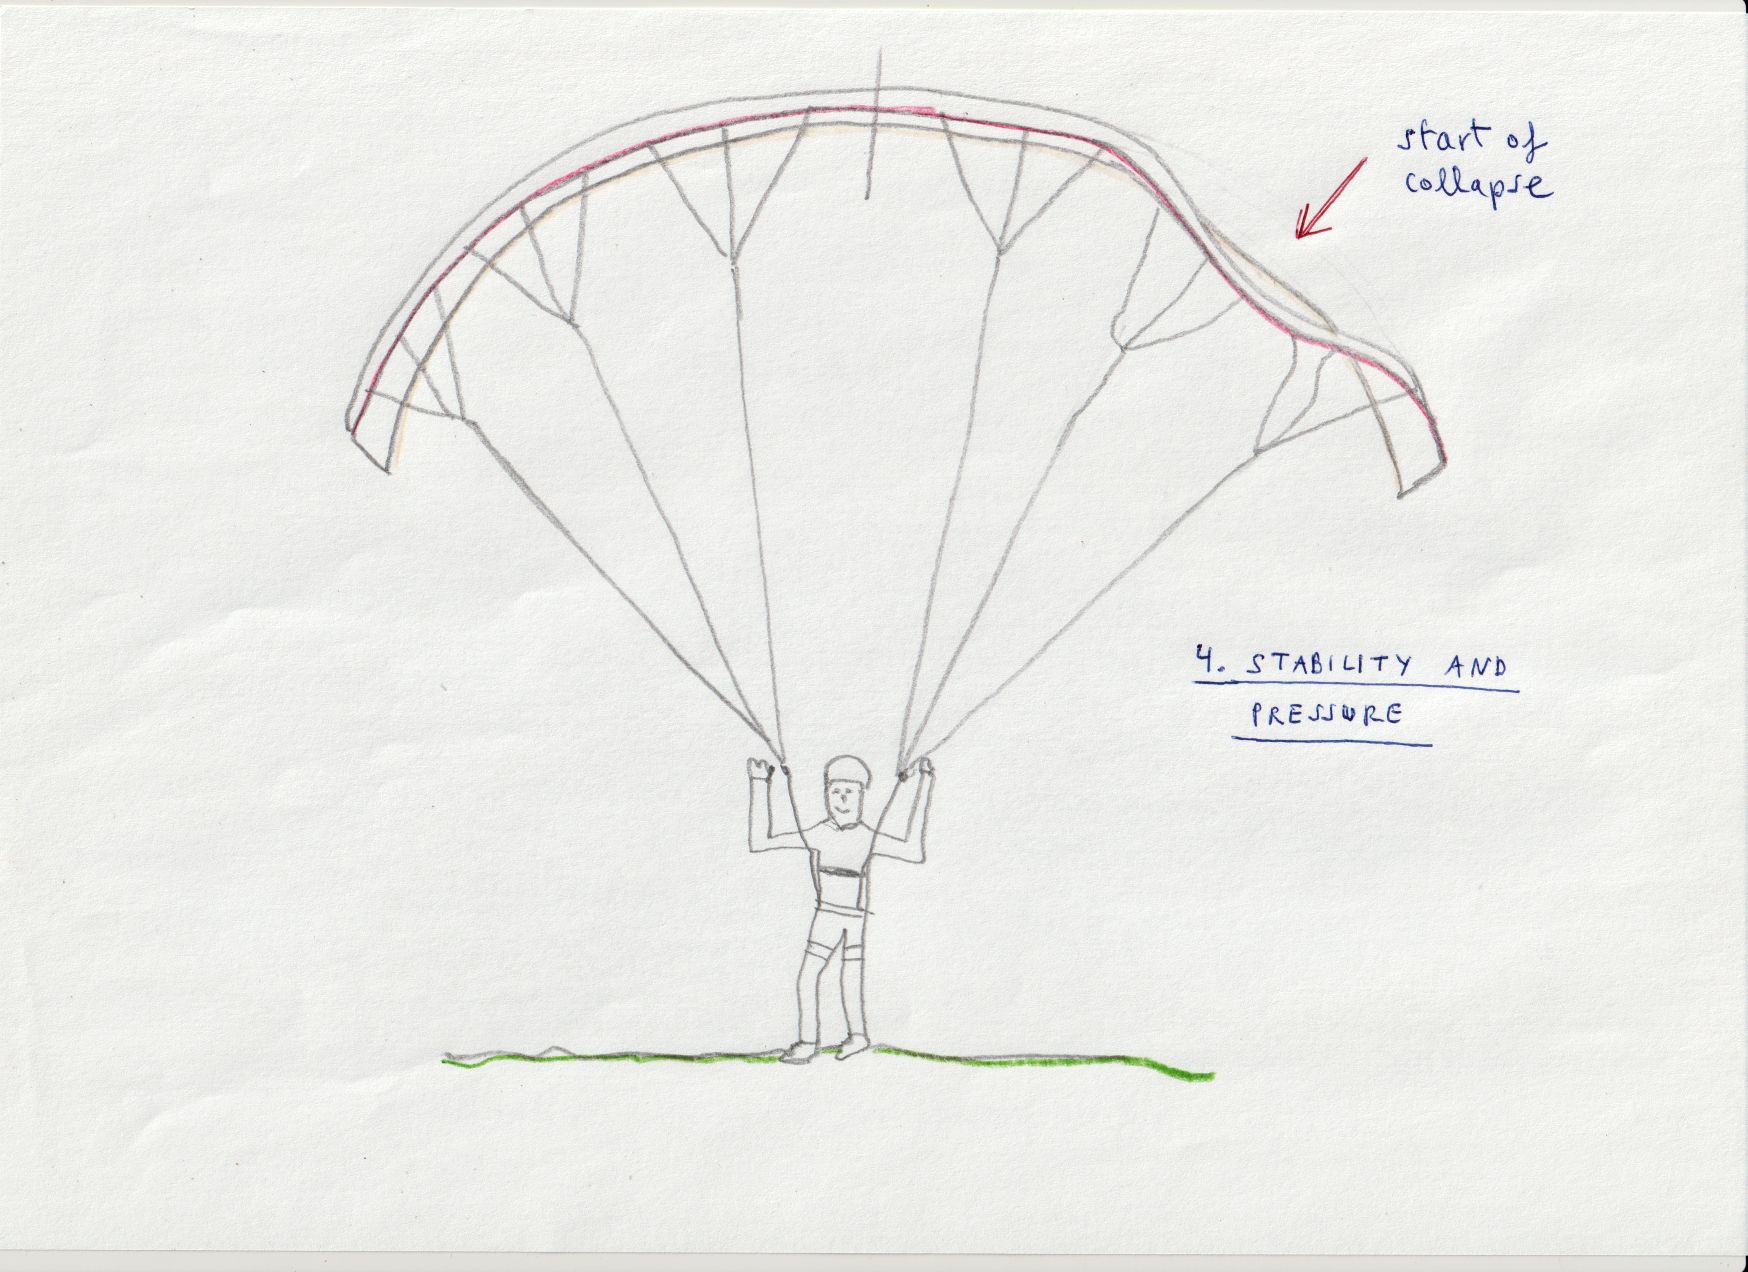
Start of collapses whe ground handling in constant and laminar wind,
may indicate some mismatch of the above parameters: calage, brake length, or geometric torsion.
Parameter mismatches can be combined, so they need to be identified individually.